I’ve actually been doing a lot of brewing over the past few months, creating and refining pilot recipes for 2MBC. Unfortunately, that doesn’t make for the most interesting brew days, let alone the most compelling blog material. Suffice it to say that NHC in San Diego lit a fire under my ass, and I hope to get back into some more experimental home brewing. Being able to go outside again doesn’t hurt either.
Anyway, one problem I’ve been trying to troubleshoot during this process has been the performance of my Belgian ale strains, specifically Wyeast 3522. It was turning out what I, at least, thought were some great beers in the past, but since moving to Leadville they’ve been chronically over-attenuated and phenolic, lacking in the ester profile that made me a fan of this strain in the first place. At this point, I’ve all but convinced myself that this is the result of switching from fermenting at about 12 psi to just under 10 psi, but lacking any way to control for that variable there is of course no way to be sure. Enter the spunding valve, a relatively simple device that allows one to ferment under controlled pressure.
I’m just kidding with the title, by the way; I see no major flaws in anyone else’s design. I just like callbacks. If you aren’t mechanically inclined enough to screw some fittings together, you can also stop reading here and buy one off the shelf, although it appears to have some issues, like maxing out at 15 psig and requiring a wrench to adjust the valve.
I do think that using an adapter as opposed to a length of tubing lends it a certain aesthetic appeal, but the chief advantage of this design is that all the parts are available on Amazon, which is convenient if, like me, you don’t have a big-box hardware store nearby — or if, like me, you just don’t like to leave the house. You can actually put one together for a few pennies less; I selected these particular components because they total $35.07 and therefore qualify for free shipping:
- Control Devices CR Series Brass Pressure Relief Valve, 0-100 psi Adjustable Pressure Range, 1/4″ Male NPT
Zenport LPG30 Zen-Tek Glycerin Liquid Filled Pressure Gauge, 30 PSI
2-1/2″ Oil Filled Pressure Gauge – Stainless Steel Case, Brass, 1/4″ NPT, Lower Mount Connection 0-30PSIEaton Aeroquip 2090-4-4S Steel Pipe Fitting, Tee, 1/4″ NPT Female
Stainless Steel 316 Cast Pipe Fitting, Tee, Class 150, 1/4″ NPT Female- Eaton Weatherhead 9100X4X4 Carbon Steel SAE 37 Degree (JIC) Flare-Twin Fitting, Swivel, Adapter, 1/4″ NPT Male x 1/4″ JIC Female
You’ll also need a ball- or pin-lock quick disconnect (grey for gas), a nylon flare washer, and some thread-sealing tape (yellow for gas), but if you’re reading this I assume you already own a keg and therefore have that stuff on hand.

Assembly instructions are left as an exercise for the reader.
Piecing the spunding valve together was the work of just a couple minutes, obviously, and I’ve spent the subsequent week playing with testing it prior to my first actual pressurized fermentation. Here’s the procedure I’ve come up with for setting the pressure:
- Attach the spunding valve to the liquid-out post of the (empty!) keg.
- Tighten the PRV to maximum pressure.
- Pressurize the keg via the gas-in post until the pressure gauge is reading somewhat higher than desired.
- Slowly back off the PRV until gas begins to flow.
- Once the gauge has dropped to the desired pressure, tighten the PRV until audible flow stops, then an additional one-quarter turn.
Using this procedure, after 48 hours the pressure had dropped from 10 psig to 6.5 psig — not ideal, but more than sufficient given the rate of CO2 evolution during fermentation.
Incidentally, don’t think you can cheap out and ignore the pressure gauge. These little PRVs are designed to be safety devices, after all, not precision instruments. You may be able to see in the photo below that the pressure is about 12 psig while the valve is set to a little over 30. You could elect to use a higher-range gauge, but with 30 psig being roughly what’s needed to carbonate at room temperature I don’t anticipate needing to go any higher than that.
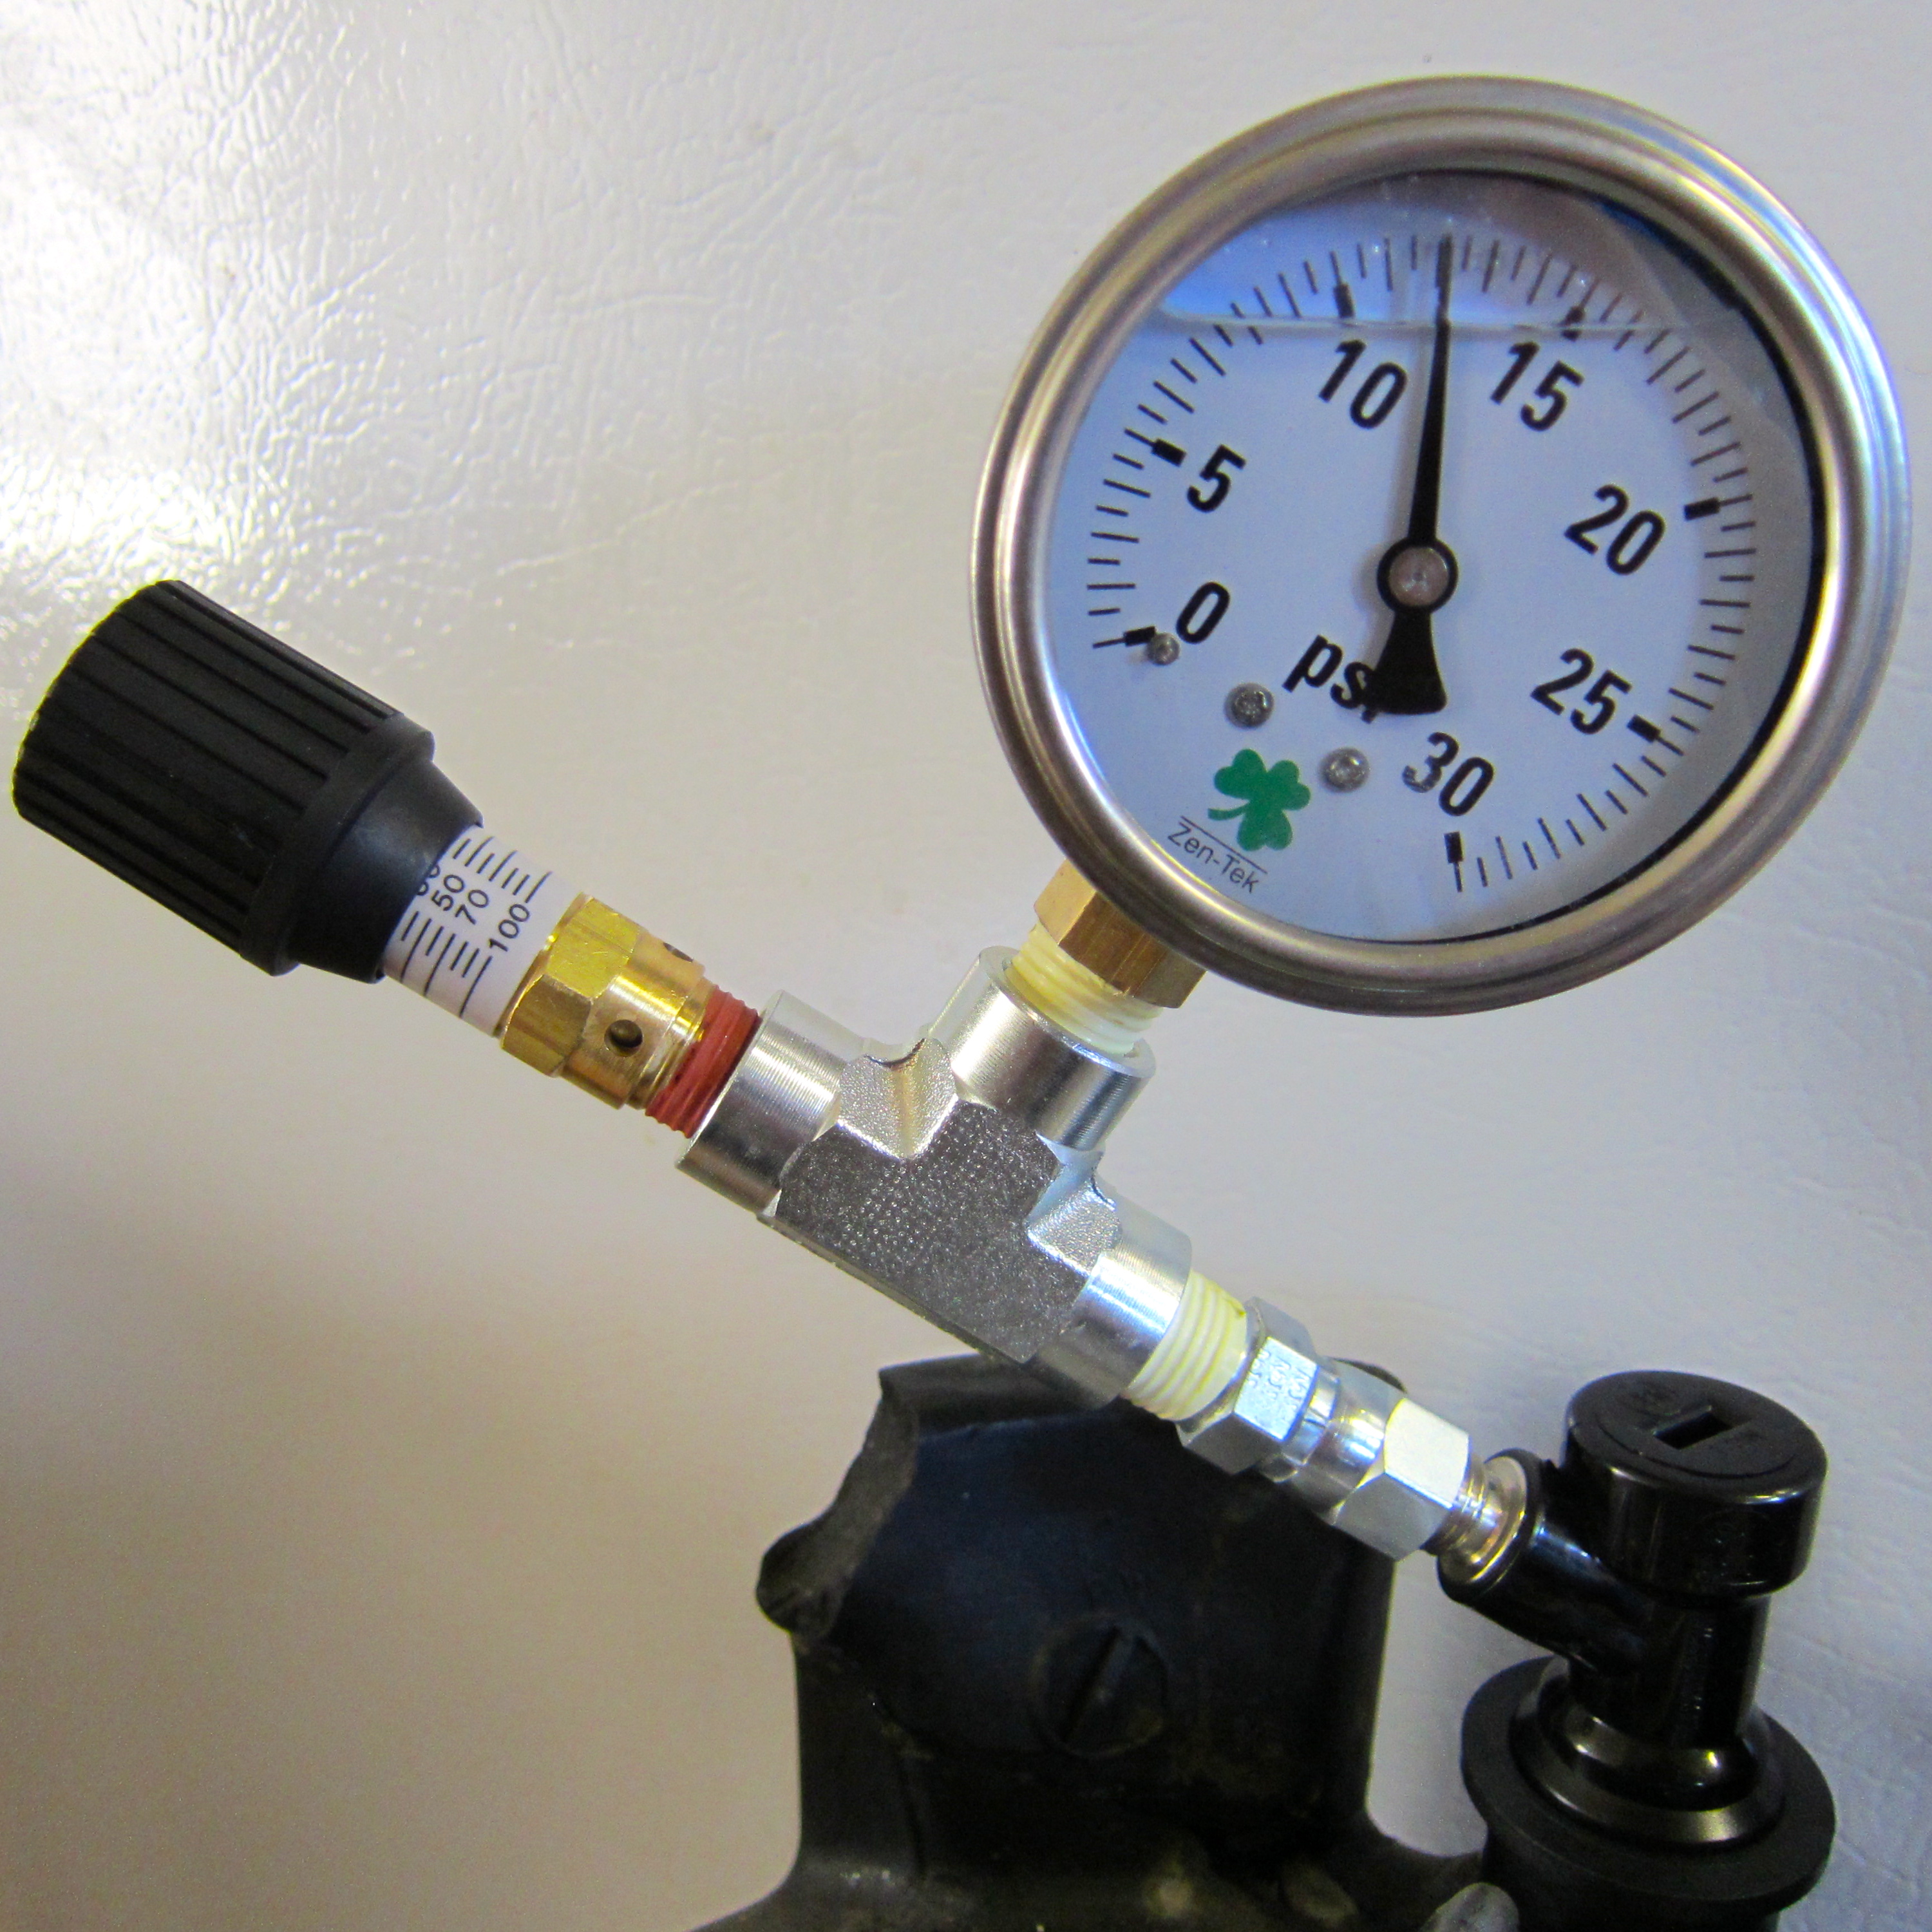
Pressure-testing the assembled spunding valve.
Update: 23 Mar 2019
I hadn’t realized how popular this post was until I checked some statistics; the combination of parts listed is actually a recommended combo on Amazon! At any rate, I’ve updated it to some items that are less expensive and/or in stock.

Good to see you back in action, great tutorial! I’ll be sharing it with Greg who I believe has been reconsidering his spunding valve build.
The commercial ones max out at 15 because of OSHA limits. Typical formentors aren’t typically rated to hold over that.
True, but that’s no reason to arbitrarily restrict a corny keg to that pressure.
[…] similar to the one Sean Terrill built, I am happy to report this valve does not leak! While the pressure relief valve this unit is built […]
Stupid question, but did you cut the little plug at the top of the pressure dial like it says to. I’m inclined not to due to worry that the glycerin will leak out the top.
I didn’t, just took it off to let the pressure equalize and then put it back on.
I’m curious, did you snip the little plug on the top of the pressure guage like the sticker says to? I’m inclined to think the glycerine will want to leak out if I do.
I didn’t, just took it off to let the pressure equalize and then put it back on.
Why use a glycerine filled pressure gauge to begin with? They are expensive and originally designed to dampen vibration in systems with oscillating pressures.
I was (somewhat arbitrarily) restricted to things that were inexpensive and qualified for free shipping from Amazon.
Be careful with that carbon steel flare-to-npt fitting. I had mine totally rust out and contaminate a beer. I’ve stopped using spunding valves since then because I can’t find a fitting like that in SS or brass. :,(
Thanks for the heads-up. I’ll have to remember not to sanitize the spunding valve itself.
I’m a bit confused on where to set the PRV. I want to try out WLP’s “high pressure” lager yeast, and they recommend fermenting at room temperature at ~14 psi (as an upper limit). In that case do I set the PRV to 14 psi during primary fermentation? In your example it is set to 30 psi. Is that where you’ve set it to blow off pressure?
I would set the PRV to whatever point gives the actual gauge pressure you want. For my PRV, a setting of 30 psi corresponds to a gauge pressure of about 12 psi, but these aren’t calibrated instruments and yours could well be different.
Ok, I see. So it’ll just be trial and error. What I’m aiming for is 14 psi on the pressure gauge. Gotcha; thanks for the build plans.
Hi Sean, thanks for this. I’m interested in using a spunding valve to finish off fermenting an english ale in a keg. Is this much different to simply hooking the keg to a dual regulator, and setting the reg valve to 12psi? Yes, you would get 12 psi from the CO2 cylinder immediately into the keg, but if the beer outgasses CO2 from final stages of fermentation, the reg would allow it to escape if it exceeds 12psi.
Thanks for making such great info available. Your yeast starter spreadsheet is just great.
-Ski
Unless your regulator is malfunctioning, it won’t allow CO2 to flow backward through it, so you’ll still need some way to release the pressure. If you don’t mind using up CO2 from your tank, you could just pull the keg PRV a few times a day to keep it close to the regulated pressure. Hope that helps.
Sean
Questions on the valve:
1.) I am not looking to ferment under pressure as I haven’t really read about a benefit, but am looking to minimize oxygen intake during any part. So I guess I guess put a 3.25 gallon batch in the 5 gallon keg, pitch yeast, and put this valve on their. Would I set it to as low as psi as possible?
2.) I think I am confusing different types of carbonation….Ive seen where people set the valve to whatever pressure they want their beer at for the last bit of fermentation. Is this done by using the valve as an airlock for 75% or so of the ferm, then setting it to say 12 psi to achieve a natural carb? Or do I use it as an airlock for 100% of the ferm, then add priming sugar to the keg and set the spund valve pressure?
either way I think I could use this just as an airlock for 100% of ferm and do a closed cell transfer to another keg for force carbing. Id just cut an inch or so off the dip tube to minimize yeast/trub.
Sorry to take so long…
1. If you don’t want to ferment under pressure, there’s no reason to use a PRV during fermentation. An airlock is all you need.
2. If you’re adding priming sugar, there’s again no need for a spunding valve. In order to carbonate with one, it would need to be set for ~30 psi at room temperature to give average (~2.5 vol) carbonation.
So I’ve done quite a few of these over the past few years. I can tell you one thing, that PRV is not the greatest. I moved to this one ( http://www.mcmaster.com/#99045K11 ), and while its expensive, I was able to old a very accurate 12psi. I have a lager going with one right now ! Good luck
@ Larry
What other parts are needed for that setup with your PRV?
Where can I order the washer?
Any well-stocked homebrew shop should have them. https://www.morebeer.com/products/flare-fitting-washer.html?site_id=9
Interesting article mate.
Could I be lazy and just hook up the gas post on my keg to the regulator on my gas bottle? Set the reg as desired, turn the bottle off and any excess pressure generated in the keg will vent through the reg?
David,
From what you’re describing it sounds like you’d have the regulator connected backwards. If you have the fittings to connect the keg in place of the CO2 cylinder, then yes, that should work.
Sean,
Are you sure Eaton Whitehead provides the correct link? I followed the link and purchase from Amazon and it seems like the diameter is 1.25″ not 0.25″. Please reply.
Thanks,
Todd
Todd,
You might consider these parts, instead, which are be better material choices for a sanitary environment (brewing):
1/4″ MPT to female flare adapter:
https://www.amazon.com/gp/product/B008E5CUFG — Brass
1/4″ NPT Female Tee fittings:
https://www.amazon.com/Parker-4-4-4-Brass-Fitting-Female/dp/B00NEFYPJK — Brass
https://www.amazon.com/Stainless-Steel-Fitting-Class-Female/dp/B003GSKXEG — Stainless Steel
When using the spunding valve setup with a corny keg for either fermentation or dry hopping under pressure…do you leave either or both of the dip tubes in the keg or remove them? My first attempt at using a spunding valve for dry hopping an IPA has so far resulted in a lot of beer being pushed up the gas out fitting and leaking out the PRV, although, at first I way overfilled the keg…
You’d have to have dip tubes in for the keg to seal, although you could swap the liquid tube for a second gas tube to keep it out of the beer. I only used the spunding valve for 3 gal batches, and never had an issue with krausen, although I only did it a handful of times.
There is at least one review on this PRV that says that it didn’t hold pressure and leaked. Sounds like they had a faulty one, but have you had any issues with this model of PRV not holding pressure over time or heard of others who have had problems with it?
I’ve only fermented maybe half a dozen batches under pressure, but I didn’t have any problems as long as I pressurized the keg ahead of time.
Wouldn’t you need to ferment under only an additional 2lbs of pressure vs 12 if you were trying to go from 10psi to 12? Unless you were fermenting under pressure at the lower altitude as well?